
As many of you may know, I am working on writing a novel, and this blog is a bit about trying to keep the juices flowing, as it is to share my discoveries in this new life abroad.
This being said, in today's day and age, everyone uses word processing software of one kind or another—writers, students, business people, etc. My software of choice is Apache OpenOffice Writer, namely because it's free, but especially because my husband is a big believer in open-source software and that's what he installed on my computer. (Secretly, I also think it's because Microsoft is a big contention point for him in general, so he tries to find alternatives at every opportunity. And yes, ironically I use Microsoft 10 Home edition.)
Anyhow, as I've mentioned, I think my computer still thinks we're in Canada despite the fact I've changed the time zone on it and all my browser searches yield UK results. Even though our printer is "British", the word processor on my computer continues to send things in the old "American" standard 'Letter' format. Since I am trying to write a novel, it's imperative that the pages come out right when I'm printing something. Not to mention that my kids' school projects would also look better in the correct format.
Without further ado, here's a quick step-by-step guide to changing the page size in your word processor. (To the best of my knowledge, it's the same steps for Mac OpenOffice users.)
Changing the Page Format in OpenOffice (v 4.1.1)
- Open an OpenOffice document.
- Click 'Format' in the file menu, and click 'Page'.

- In the dialog box that appears, select the 'Page' tab to view the page's current settings.
- In the drop-down menu to the right of 'Format', select 'A4'. (This is the standard letter/paper size in the UK.) If you're paying attention, you'll notice the Width and Height change, as well as the 'page' thumbnail to the right.
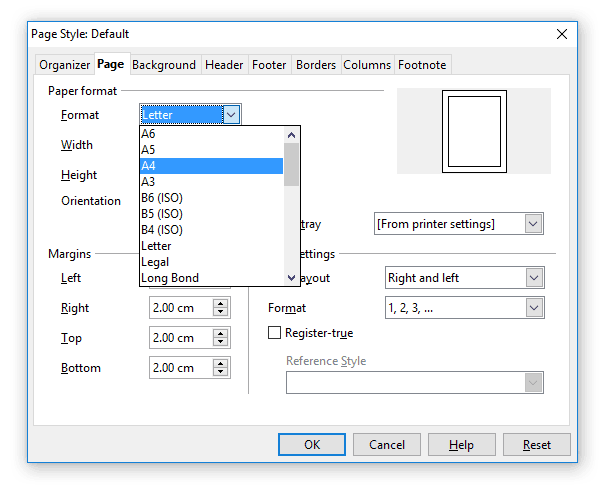
 |
| Portrait Dimensions |
- Click 'OK'. The page's settings will have changed, and your document will be the right size to view/print in the UK, without clipped edges or other unforeseen complications.
For people going from the UK to Canada (or the USA), you'll want to use 'Letter' for regular-sized paper, and 'Legal' for legal contracts/documents.
Now, if you plan to stay in the UK for a long period of time, you might consider making this format [size] the default page setting, so you don't forget to switch the format every time you open/save/print a document. This is especially useful if you have kids, since they normally pay absolutely no attention to these kinds of details—it's hard enough to actually get them to do their homework, right?
To be able to save it as the default, you need to turn it into a template first. It's super easy—if I can do it, anyone can!
Setting the New Format to Default
- Create a new OpenOffice document, and repeat the above steps to turn the blank document into the correct A4 format.
- In the file menu, click 'File', find and click 'Templates', then click 'Save'.

- A dialog box will open. Type in a name for your new template (where it says 'New template'), then click 'OK'.
You've just created a template! ☼ Huzzah! ☼
 |
| I named my template 'UKA4'. |
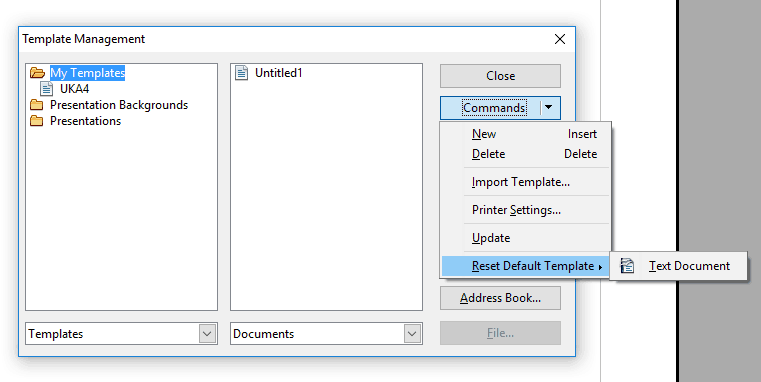
- Now, go back to the file menu, click 'File', click 'Templates', and click 'Organize'.

- A new dialog box will appear. Double-click the 'My Templates' folder on the left-hand side.
- Select the template you named.
- To the right you will see a 'Commands' drop-down menu. Click it and choose 'Set As Default Template'. Then click 'Close' (the button above 'Commands').

Presto! You now have the correct page sizes for writing and printing in the standard UK 'A4' format. By setting it as the default, you won't have to format documents every time you open/create one.
Before you print your document, make sure the printer's settings are also based on the current format of your document so no clipping/empty spaces occur. In my case, as the printer was bought in the UK, it is already set up to print 'A4'.
Once you've set the 'A4' format as the new default in your word-processor, if you open an older document, the information contained on that document will still have its old page settings.Prior to moving here, all my documents were 'Letter' size/format. If I open one of those now that the default setting is 'A4', if I click 'File' > 'Format' > 'Page', it will display 'Letter' under the 'Page' tab. I will have to manually change the format of those older documents if I plan to print them on A4. Either that, or simply deal with the white space and minor clipping.
It's more of an issue if your document has images on it. If that's going to be a problem for you, since I'm really no expert, I suggest you check out the OpenOffice forums.
If you're a Word user on Windows, this entry might help guide you a bit, but you might prefer to check with the experts over at Microsoft. The following link is more specific to Word for Mac users.
If you're a Mac user with Apple Pages documents to modify, visit their how-to guide, here.
I suppose the software possibilities are endless, so I'll leave you with the most-used products info I can think of.
Last but not least, if/when you need to go back to the previous 'Letter' format (as I will, when we move back to Canada), simply return to the file menu, click 'File', click 'Templates', and click 'Organize'. In the dialog box, under the 'Commands' drop-down menu, select "Reset Default Template' and choose 'Text Document'.
Hopefully this guide will help you with your own—and your kids'—projects. Happy writing!
No comments:
Post a Comment
Tell me what you think, and share your own experiences, I'd love to hear from you! :)